RELATIVE LAYOUT
What is a Relative Layout?
Android RelativeLayout enables you to specify how child views are positioned relative to each other. The position of each view can be specified as relative to sibling elements or relative to the parent.
Attribute & Description
android:id
This is the ID that uniquely identifies the layout.
android:gravity
This specifies how an object should position its content, on both the X and Y axes. Possible values are top, bottom, left, right, center, center_vertical, center_horizontal, etc.
android:ignoreGravity
This indicates what view should not be affected by gravity.
android:layout_above
Positions the bottom edge of this view above the given anchor view ID and must be a reference to another resource, in the form "@[+][package:]type:name".
android:layout_alignBottom
Makes the bottom edge of this view match the bottom edge of the given anchor view ID and must be a reference to another resource, in the form "@[+][package:]type:name".
android:layout_alignLeft
Makes the left edge of this view match the left edge of the given anchor view ID and must be a reference to another resource, in the form "@[+][package:]type:name".
android:layout_alignParentBottom
If true, makes the bottom edge of this view match the bottom edge of the parent. Must be a boolean value, either "true" or "false".
android:layout_alignParentEnd
If true, makes the end edge of this view match the end edge of the parent. Must be a boolean value, either "true" or "false".
android:layout_alignParentLeft
If true, makes the left edge of this view match the left edge of the parent. Must be a boolean value, either "true" or "false".
android:layout_alignParentRight
If true, makes the right edge of this view match the right edge of the parent. Must be a boolean value, either "true" or "false".
android:layout_alignParentStart
If true, makes the start edge of this view match the start edge of the parent. Must be a boolean value, either "true" or "false".
android:layout_alignParentTop
If true, makes the top edge of this view match the top edge of the parent. Must be a boolean value, either "true" or "false".
android:layout_alignRight
Makes the right edge of this view match the right edge of the given anchor view ID and must be a reference to another resource, in the form "@[+][package:]type:name".
android:layout_alignStart
Makes the start edge of this view match the start edge of the given anchor view ID and must be a reference to another resource, in the form "@[+][package:]type:name".
android:layout_alignTop
Makes the top edge of this view match the top edge of the given anchor view ID and must be a reference to another resource, in the form "@[+][package:]type:name".
android:layout_below
Positions the top edge of this view below the given anchor view ID and must be a reference to another resource, in the form "@[+][package:]type:name".
android:layout_centerHorizontal
If true, centers this child horizontally within its parent. Must be a boolean value, either "true" or "false".
android:layout_centerHorizontal
If true, centers this child horizontally within its parent. Must be a boolean value, either "true" or "false".
android:layout_centerVertical
If true, centers this child vertically within its parent. Must be a boolean value, either "true" or "false".
android:layout_toEndOf
Positions the start edge of this view to the end of the given anchor view ID and must be a reference to another resource, in the form "@[+][package:]type:name".
android:layout_toLeftOf
Positions the right edge of this view to the left of the given anchor view ID and must be a reference to another resource, in the form "@[+][package:]type:name".
android:layout_toRightOf
Positions the left edge of this view to the right of the given anchor view ID and must be a reference to another resource, in the form "@[+][package:]type:name".
android:layout_toStartOf
Positions the end edge of this view to the start of the given anchor view ID and must be a reference to another resource, in the form "@[+][package:]type:name".
Example
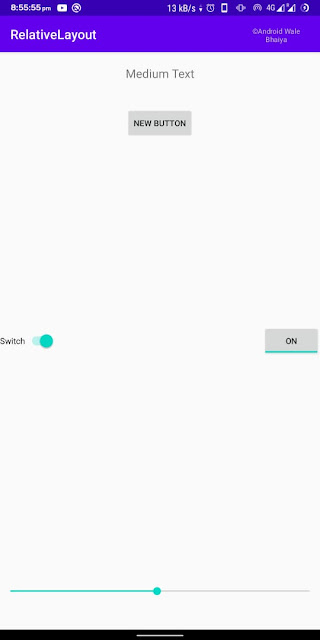
This example will take you through simple steps to show how to create your own Android application using a Relative Layout.
Open res -> layout -> activity_main.xml and add following below code:
<?xml version="1.0" encoding="utf-8"?>
<RelativeLayout
    xmlns:android="http://schemas.android.com/apk/res/android"
    xmlns:app="http://schemas.android.com/apk/res-auto"
    xmlns:tools="http://schemas.android.com/tools"
    android:layout_width="match_parent"
    android:layout_height="match_parent"
    tools:context=".MainActivity">

    <TextView
        android:layout_width="wrap_content"
        android:layout_height="wrap_content"
        android:textSize="20sp"
        android:text="Medium Text"
        android:layout_marginTop="20dp"
        android:id="@+id/textView"
        android:layout_alignParentTop="true"
        android:layout_centerHorizontal="true" />

    <Button
        android:layout_width="wrap_content"
        android:layout_height="wrap_content"
        android:text="New Button"
        android:id="@+id/button"
        android:layout_below="@+id/textView"
        android:layout_centerHorizontal="true"
        android:layout_marginTop="40dp"/>
    <Switch
        android:layout_width="wrap_content"
        android:layout_height="wrap_content"
        android:text="Switch"
        android:id="@+id/Switch"
        android:layout_centerVertical="true"
        android:layout_alignParentLeft="true"
        android:layout_alignParentStart="true"/>

    <ToggleButton
        android:layout_width="wrap_content"
        android:layout_height="wrap_content"
        android:text="New ToggleButton"
        android:id="@+id/toggleButton"
        android:layout_centerVertical="true"
        android:layout_alignParentRight="true"
        android:layout_alignParentEnd="true"/>

    <SeekBar
        android:layout_width="match_parent"
        android:layout_height="wrap_content"
        android:layout_marginBottom="50dp"
        android:id="@+id/seekBar"
        android:layout_alignParentBottom="true"
        android:layout_centerHorizontal="true"/>


</RelativeLayout>
Open JAVA->package->MainActivity.java and add following below code:
val callable = Mockito.mock(Callable::class.java)
Mockito.`when`(callable.call()).thenReturn(/* … */)
package com.example.relativelayout;

import androidx.appcompat.app.AppCompatActivity;

import android.os.Bundle;

public class MainActivity extends AppCompatActivity {

    @Override
    protected void onCreate(Bundle savedInstanceState) {
        super.onCreate(savedInstanceState);
        setContentView(R.layout.activity_main);
    }
}
open AndroidMainfest.xml and add following below code:
<?xml version="1.0" encoding="utf-8"?>
<manifest xmlns:android="http://schemas.android.com/apk/res/android"
    package="com.example.relativelayout">

    <application
        android:allowBackup="true"
        android:icon="@mipmap/ic_launcher"
        android:label="@string/app_name"
        android:roundIcon="@mipmap/ic_launcher_round"
        android:supportsRtl="true"
        android:theme="@style/AppTheme">
        <activity android:name=".MainActivity">
            <intent-filter>
                <action android:name="android.intent.action.MAIN" />

                <category android:name="android.intent.category.LAUNCHER" />
            </intent-filter>
        </activity>
    </application>

</manifest>
Output
Conclusion
This is how we can use RelativeLayout in android applications based on our requirements.
#Androidwalebhaiya
val callable = Mockito.mock(Callable::class.java)
Mockito.`when`(callable.call()).thenReturn(/* … */)
val callable = Mockito.mock(Callable::class.java)
Mockito.`when`(callable.call()).thenReturn(/* … */)


No comments: